The audio plugin market these days is oversaturated to put it mildly. Dozens of companies advertise their plugins as ‘life-changing’ and ‘must-have’, and the temptation to spend a hundred bucks on a new compressor or EQ DAW plugin when you already have ten is still hard to resist. Admit it, we’ve all been there!
It’s not that I’m saying all those plugins are bad or useless, not at all, but the thing is that there is also a huge free plugin segment that is often unjustifiably overlooked. With the right audio source and a clear understanding of what you’re doing you can achieve outstanding results even with free DAW plugins.
So, today, we’ll explore how to recreate the drum sound from Tesseract‘s latest record War Of Being using the Fame & Fury library by Hertz Drums and some free audio plugins. Be sure to watch the video lesson and download the materials attached to this post to mix along! You’ll find the links to all free audio plugins I’ve used in this session under the screenshots as well as listed at the end of the post.
First, let’s set up the routing in Hertz Drums. Go to “Audio routing” and click on “multi outs routing”. This way, you’ll have individual instrument groups on separate outputs in your DAW, so you can use your favorite plugins. Note that the close mic signals (the DIs) are separated from the Overheads, Room, and Reverb. This routing scheme allows you to apply EQ or compression to the close mics, and process the ambience separately.
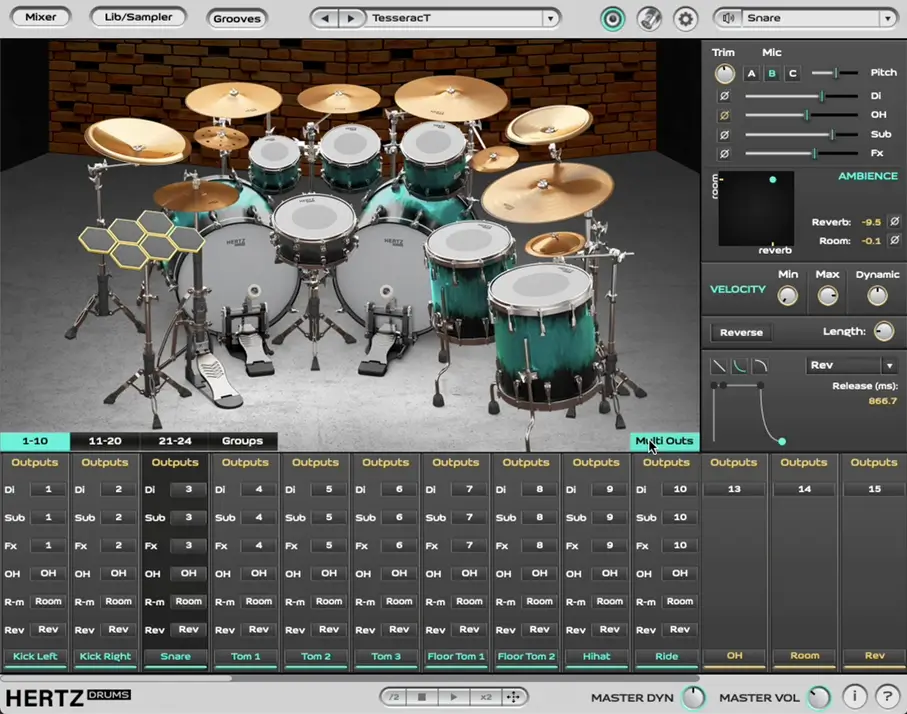
Pic. 1 Multi Outs Routing in Hertz Drums
For both bass drums I’m using from Fame & Fury library the ‘Deathblow’ kick with Mic C pitched down to -0.3. The settings on both kicks are identical. How do I choose the right instrument? Well, it’s more of a gut feeling, but what really helps me out is that in Hertz Drums I can quickly preview the samples just by clicking on them in the library. In this case, “Deathblow” aligns well with the reference in terms of pitch and attack.
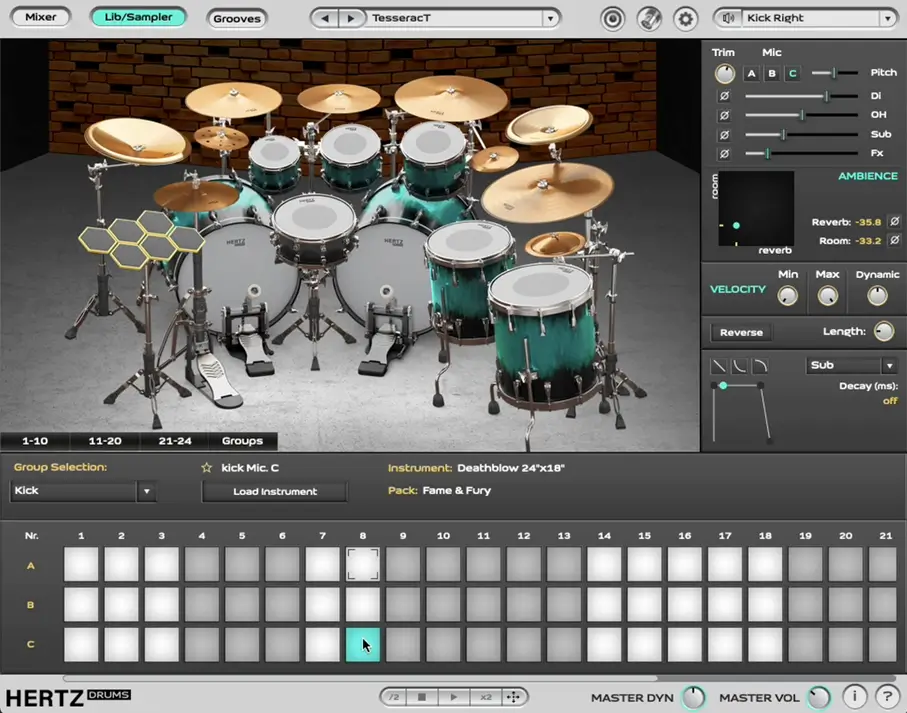
Pic. 2 Fame & Fury library – Bass Drum selection
But there’s one thing we need to do – give the kick a bit more punch to make it snappier.
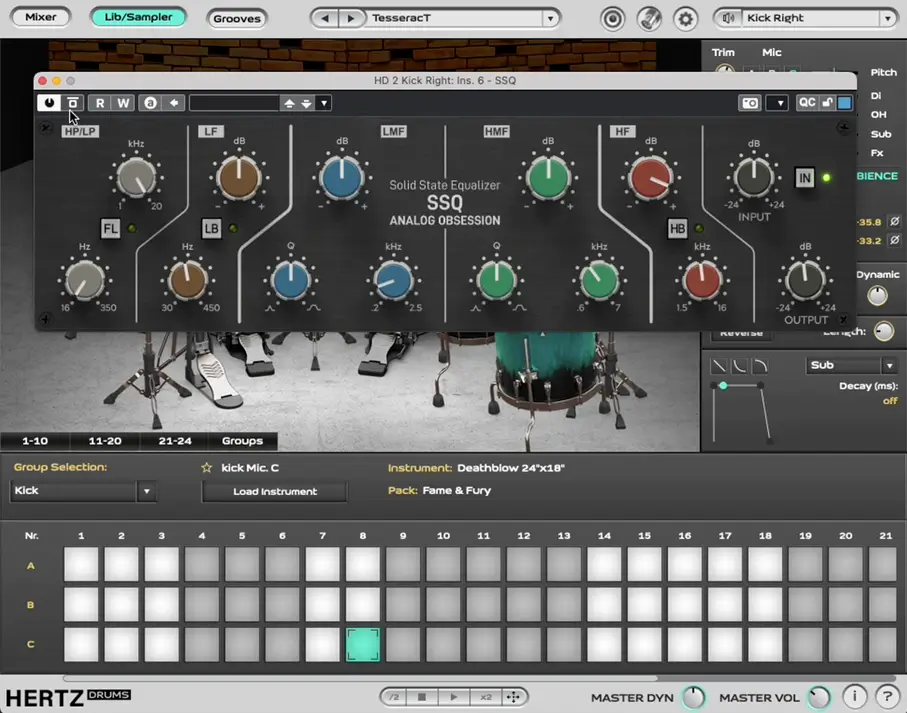
Pic. 3 Kick Right EQ
SSQ by Analog Obsession: https://www.patreon.com/posts/ssq-54598496
On the HD Out 2 channel, which is our Kick Right, I added a plugin called SSQ by Analog Obsession. It’s a free EQ that’s perfect for tweaking higher tones. Just dial in around +12 dB at 8.5 kHz, and listen to how it blends into the mix.
But that’s not all. Listen carefully to the original mix and pay attention to the kick drum sound. Notice how the attack changes depending on whether it’s single hits in slower parts or double bass in faster sections.
I can hear that the kick has less attack and is less boomy when played faster. To replicate this, you need to separate the fast and the slow hits and process them separately. Open your MIDI file, and switch all the double bass notes from C1 to B0. Now the right kick plays single hits, and the left kick joins during the double bass hits.
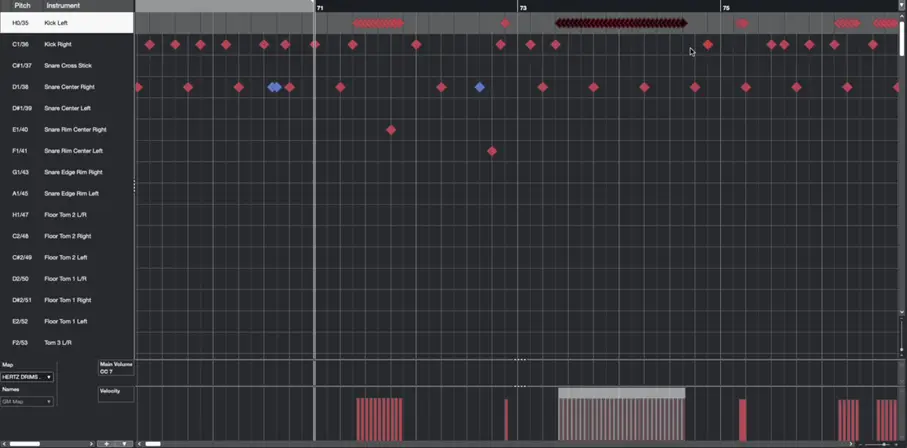
Pic. 4 Separating double kicks from single hits
Note that I always keep the first note of the double strokes on C1 so that the first hit is more powerful than the faster B0 hits. This technique replicates the natural dynamics of a drummer, with the right leg typically being stronger than the left one, and it’s a common trick among producers. I first used it when on Organic Hallucinosis by Decapitated and it has worked work well for me ever since.
Load the same settings on the left kick as on the right kick. Add an SSQ EQ by Analog Obsession. Cut 8 dB at 90 Hz, and add 2-3 dB around 9 kHz on the left kick, the one handling double bass hits. Here’s how the two kick EQs look in my session.
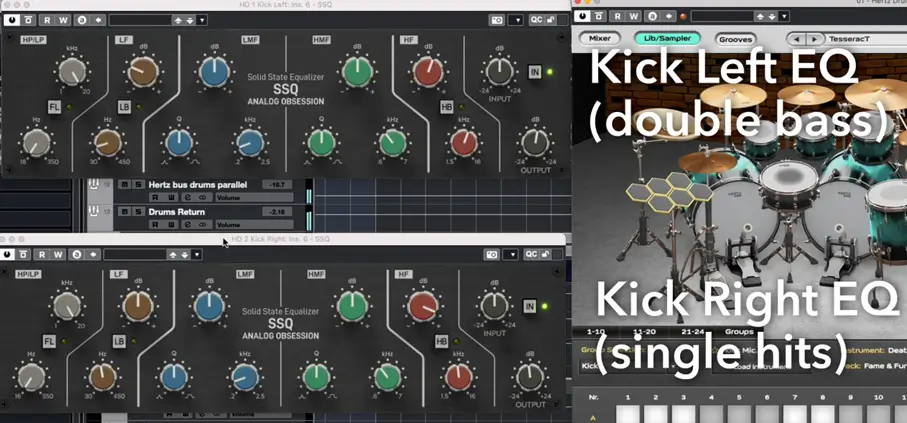
Pic. 5 Kick Left and Kick Right EQs
SSQ by Analog Obsession: https://www.patreon.com/posts/ssq-54598496
For the snare, I’m using the ‘Core’ snare with Mic B from Fame & Fury library. I’ve inverted the phase on the snare’s overhead channel and trimmed the reverb tail to 870 ms.
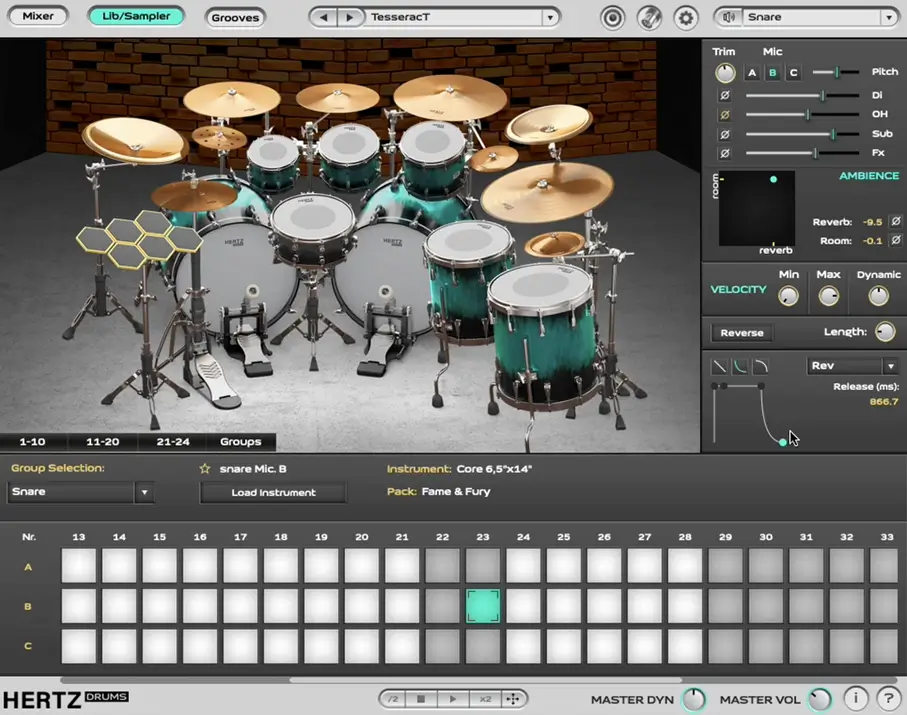
Pic. 6 Snare settings in Fame & Fury library.
With an EQ, I’ve boosted 288 Hz by 5 dB and 448 Hz by 8 dB, while making a 4 dB cut at 4.74 kHz with a hi-shelf. These EQ settings recreate the character of the reverb used in TesseracT’s sound.
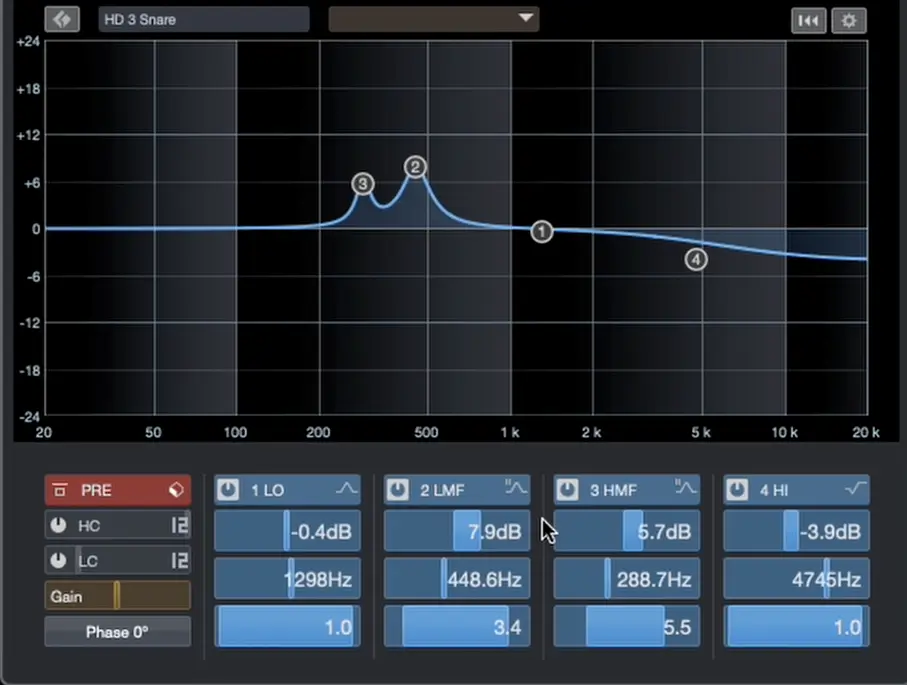
Pic 7. Snare EQ 1
I’ve also added a second EQ, the SSQ, to enhance the punch and attack of the snare. I added 6 dB at 120 Hz and 8 dB around 5.5 kHz. Now, let’s hear how this additional EQ affects the snare.

Pic 8. Snare EQ 2
SSQ by Analog Obsession: https://www.patreon.com/posts/ssq-54598496
After the EQs I’ve added Kolin MB compressor by Analog Obsession to get more ‘body’ out of the snare.
Here I’m using a slow attack at 35 ms, release at 400 ms, low crossover at 310 Hz (meaning everything below this frequency is compressed), the output at 8 dB, and the input at 25 dB.
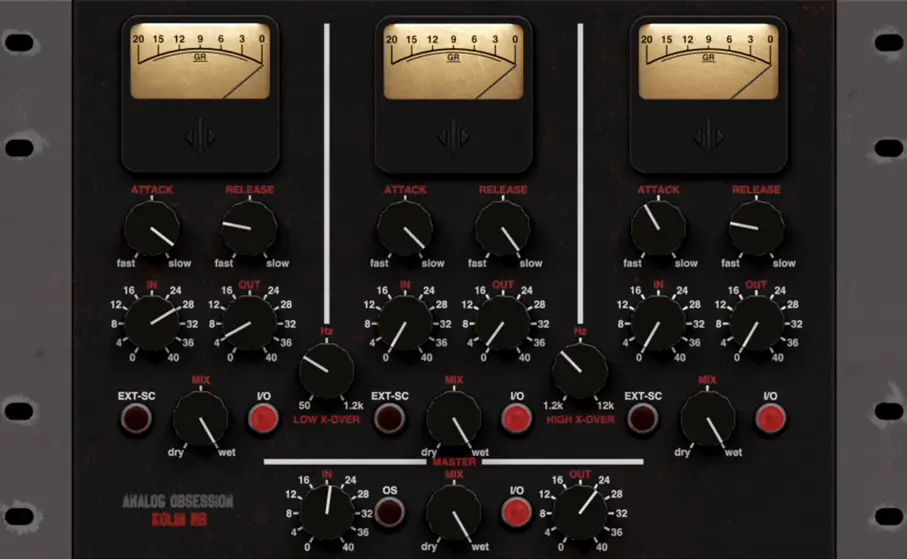
Pic. 9 Snare Compression
Kolin MB by Analog Obsession:
Moving on to the toms, I’m using the set of toms from the Fame & Fury library with Mic C on all of them, and I’m pitching them all down to to -2.7.
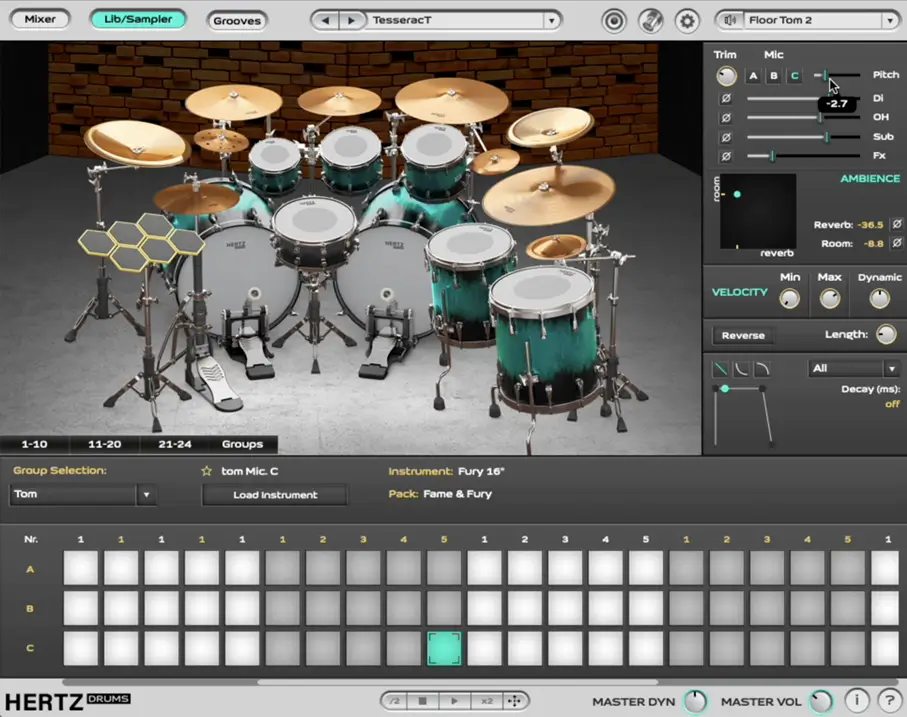
Pic. 10 Tom settings in Hertz Drums
There are two ways of doing this in Hertz Drums. First, with one of the toms selected, I can move the pitch slider to the left while holding the Shift key, and the pitch will change on all toms at once.
Second, I can go to the MIxer, switch to the group view, and instead of a pan slider there’s a pitch control for the whole group. Here, you can quickly adjust the pitch of any instrument group.
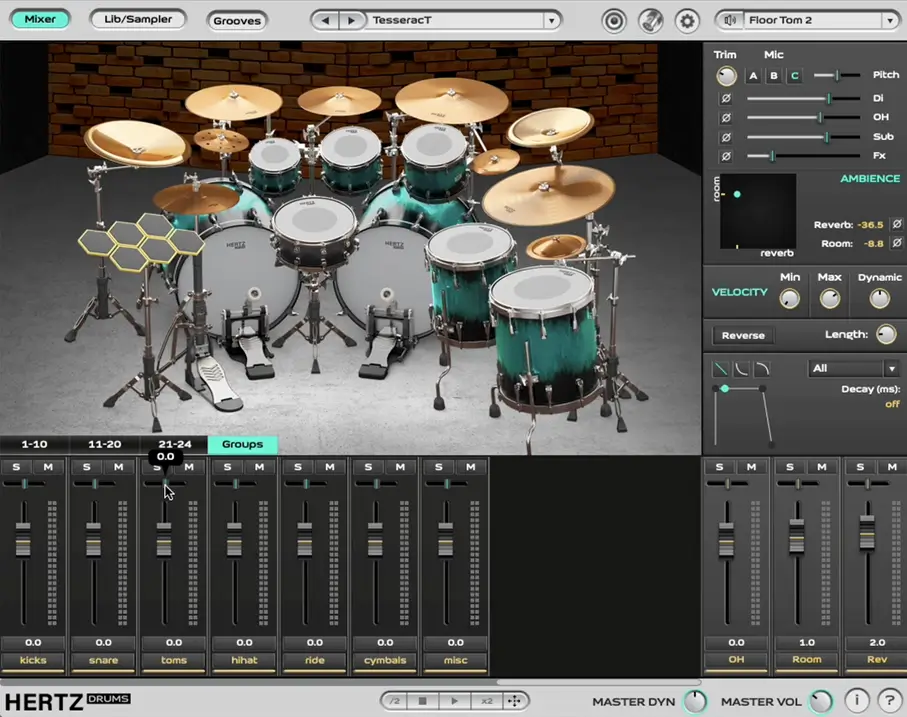
Pic. 11 Pitch slider on the Tom Group channel in Hertz Drums.
Let’s move on to the overheads – it’s channel HD 13. Here I’m cutting 6 dB at 360 Hz with a low shelf and adding 6 dB around 2 kHz with a high shelf. This adds nice brightness not only to the cymbals but also the kick, snare, and toms.
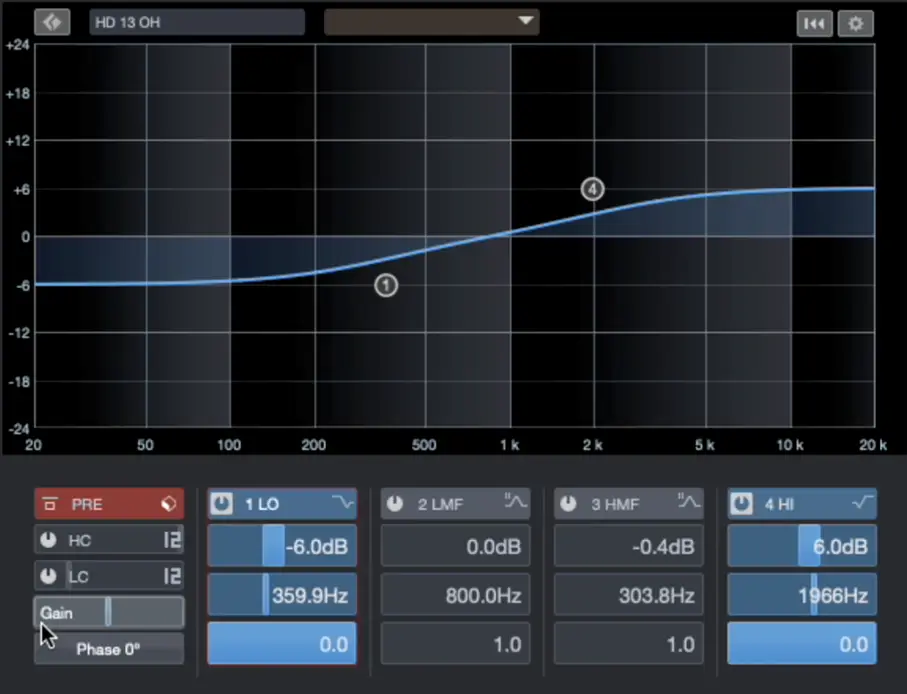
Pic. 12 Overhead channel EQ
On the channel HD 14 we’ve got our room mics.
With an EQ I’m adding 9 dB at 430 Hz, 2 dB at 1.3 kHz, and I’m cutting 4 dB at 1.3 kHz which is pretty close to what I’m hearing in Tesseract’s mix.
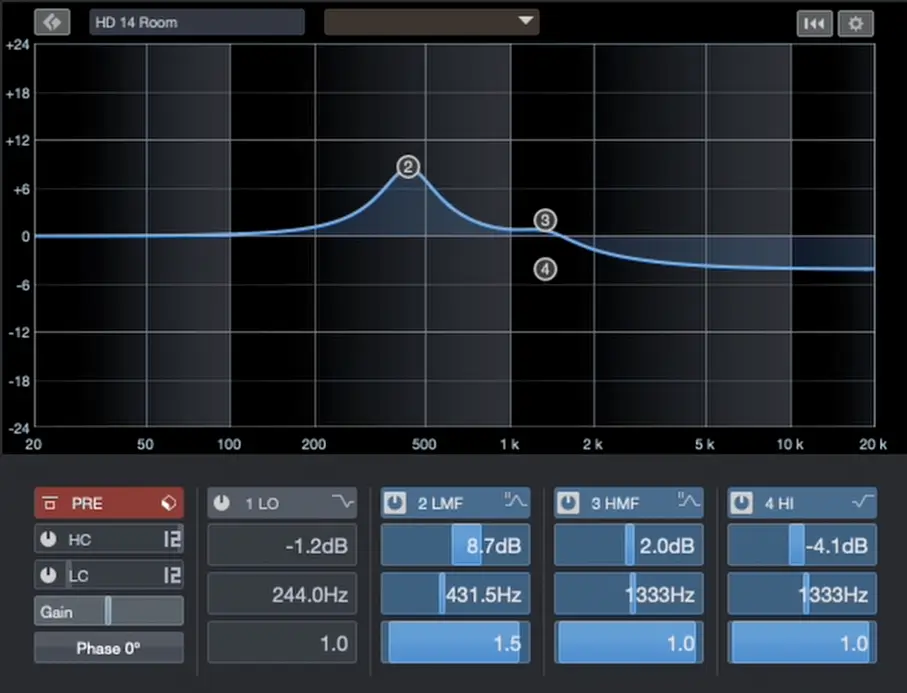
Pic. 13 Room channel EQ
Then I’m also using this free plugin called TrackControl by DMG Audio to widen the stereo image of the room mics. I increased it by 150% with a delay of about 11 ms.
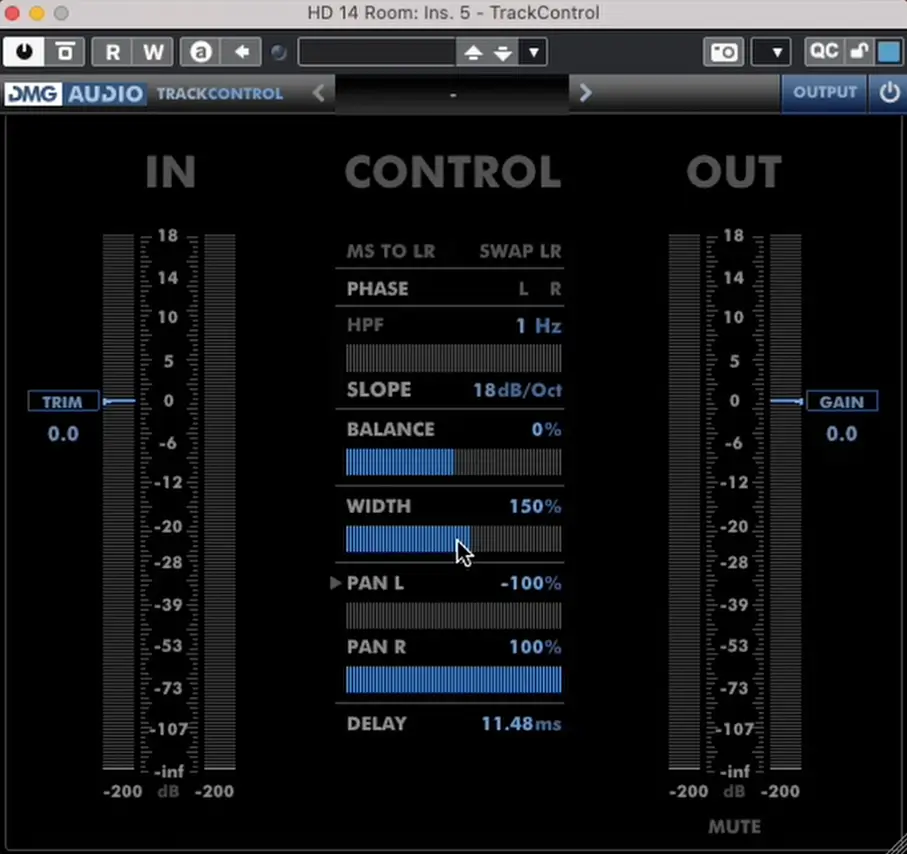
Pic. 14 Making the Room wider with TrackControl
by DMG Audio:
Now I’ll move on to the channel HD 15 which is the reverb group channel for the whole kit. Here I’m using a similar EQ, boosting 11 dB at 437 Hz, 6 dB at 750 Hz, and cutting 6 dB at 2.7 kHz with a high shelf.
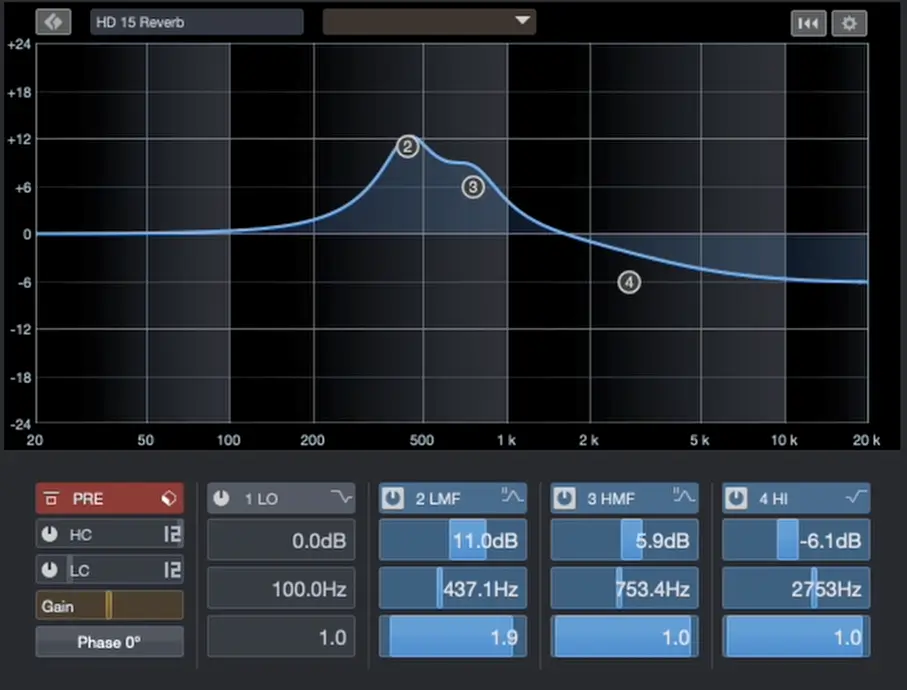
Pic. 15 Reverb channel EQ
I also added Trackcontrol just like on the room channel, but with a slightly smaller value of 126%, and a 6 ms delay. This creates a 3D ambient effect where the room is more pronounced in stereo, while the reverb is more focused yet separated from the elements in the center.
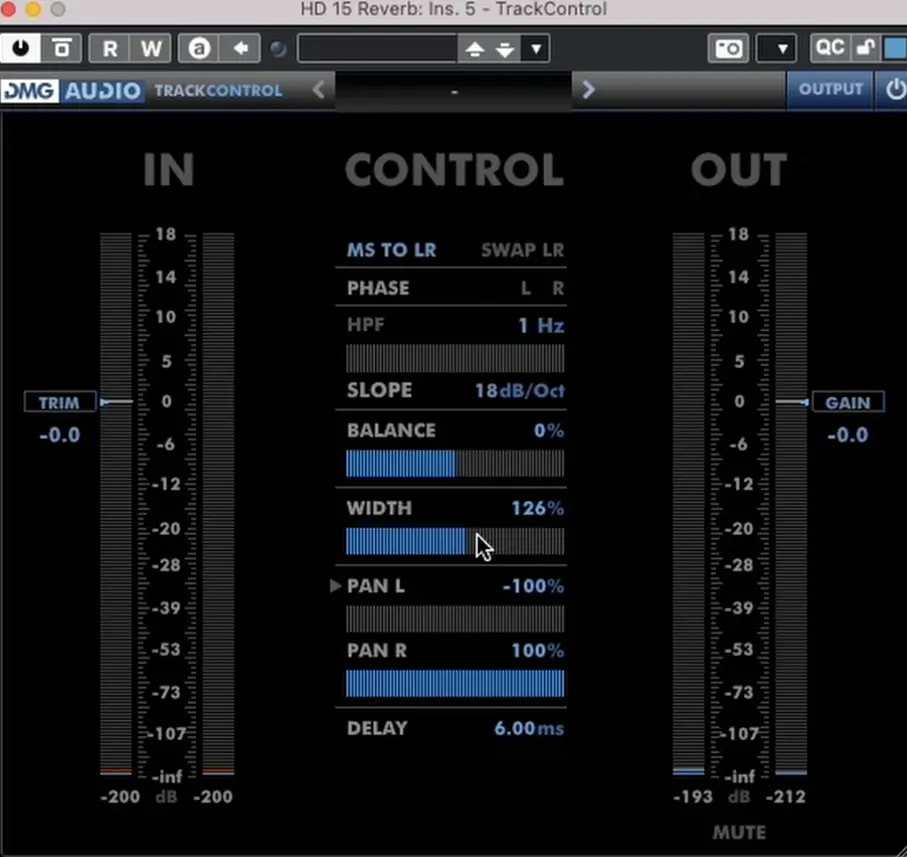
Pic. 16 Reverb stereo image adjustment with TrackControl by DMG Audio:
I’m sending all these channels to “Hertz Drums Bus” group without any plugins or EQ, and I’m also sending the signal in parallel to another group called “Hertz Drums Bus Parallel” where I’m using an EQ and two compressors. This parallel group gives me better control over the dynamics – I can automate its volume in the mix to give the drums more or less punch in different sections of the song.
On the “Hertz Drums Bus Parallel” channel, I’m cutting the low end by about -14 dB at 78 Hz to enhance the body and snap of the drums, which becomes more pronounced with greater compression.
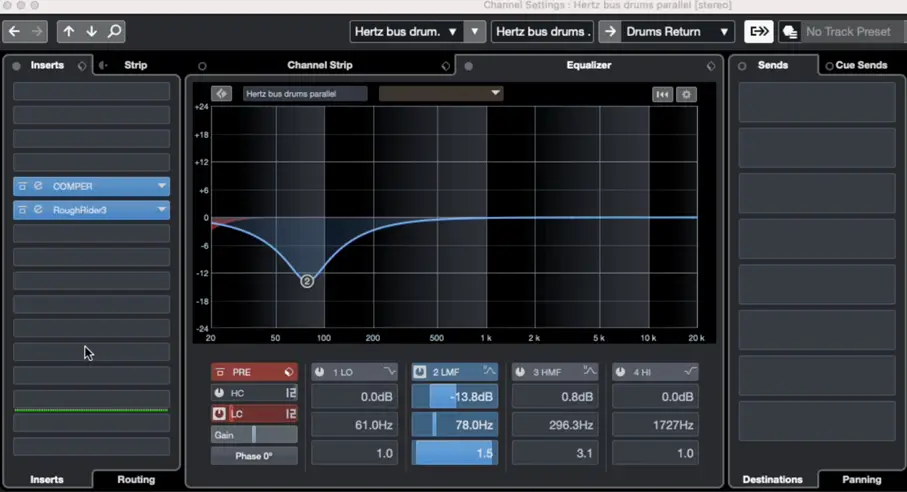
Pic 17. Parallel Bus FX chain
The first compressor I’m using is COMPER by Analog Obsession. It combines two compressors in one, perfect for adding character and taming peaks simultaneously. I’m setting the threshold at -16.7, the ratio at 7.2, the attack time is 21 ms, fast release, gain is at +10 dB, circuits set to FET, a side-chain high-pass filter at 40 Hz, input at -9 dB, and the dry-wet mix at 53%.
On the lower compressor the threshold is at -10, ratio at 6.2, the attack time is 29 ms, fast release, gain at +4.6 dB, circuits set to VCA and FET, a side-chain high-pass filter at 306 Hz, input at 0 dB, and the dry-wet mix is at 56%.
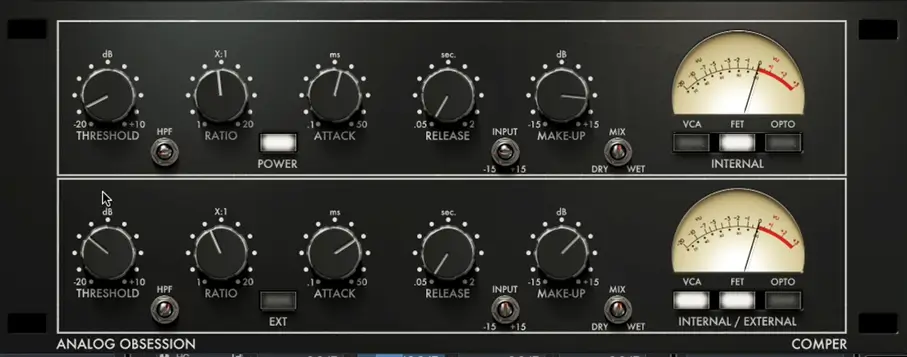
Pic. 18 Compressor 1 on Parallel Bus
COMPER by Analog Obsession:
Next compressor is RoughRider 3 by Audio Damage. I like it because it can be pushed hard with a smooth sound even at very low thresholds and high compression levels. I’m impressed with this compressor.
I’m setting a high-pass filter at 114.5 Hz, the ratio of 194:1, sensitivity (threshold) at -30 dB, attack at 100 ms, release at 85 ms, the dry-wet mix at 86%, and the output level at +5 dB.
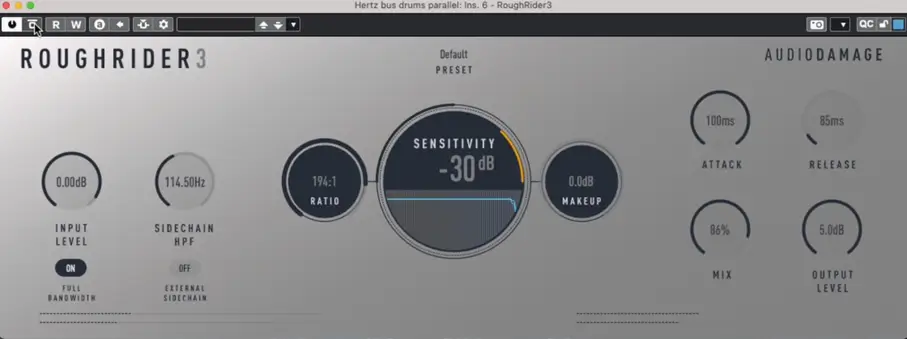
Pic 19. Compressor 2 on Parallel Bus
ROUGHRIDER by Audio Damage:
That wraps up our today’s session. I had a lot of fun making this and I hope my tips will help you improve your mixes. At the links below you will find the mix-ready Hertz Drums preset for the Fame & Fury expansion. I used in this video, as well the video version of this guide.
Till next time!
Wojtek Wiesławski – sound engineer and producer at Hertz Studio (Decapitated, Behemoth, Vader, Hate and more)
Subscribe to our newsletter to stay updated with the latest news from Hertz Instruments and enjoy a 10% discount on all products!
